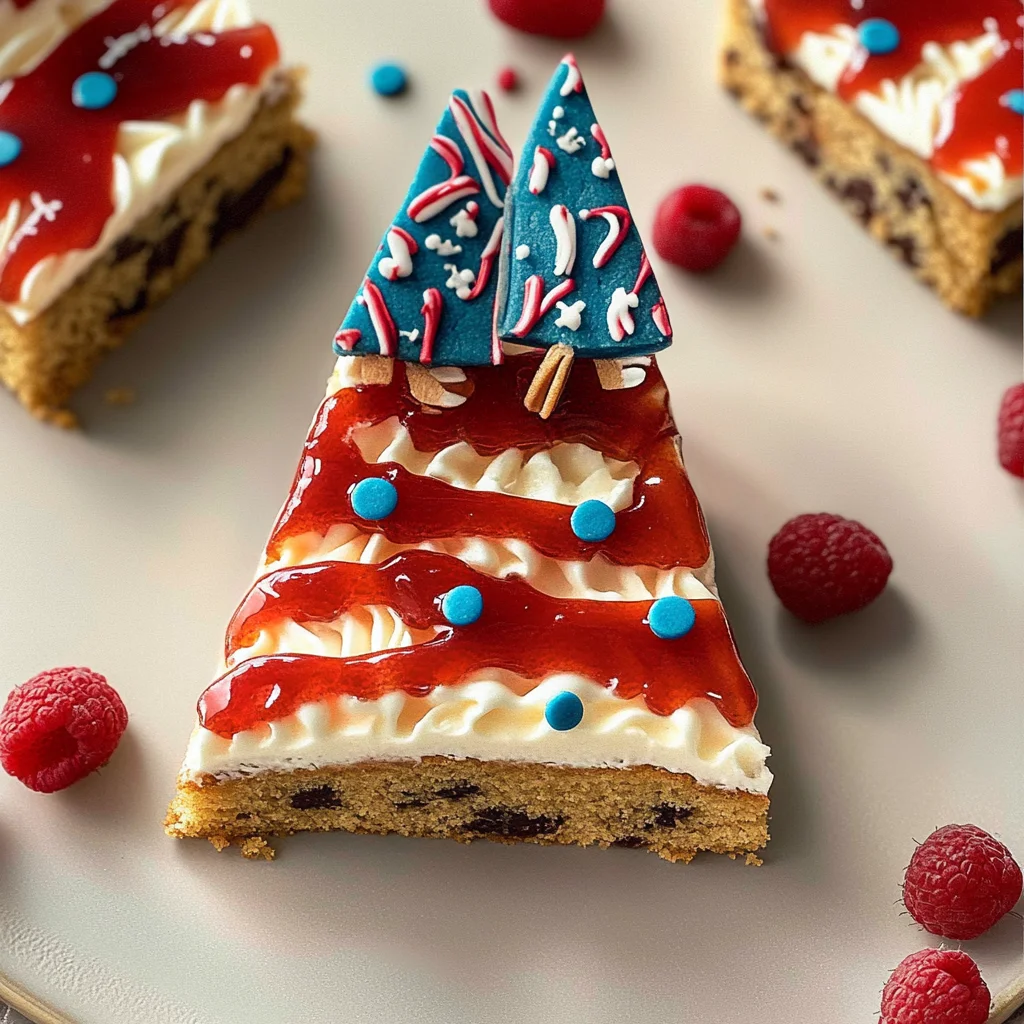
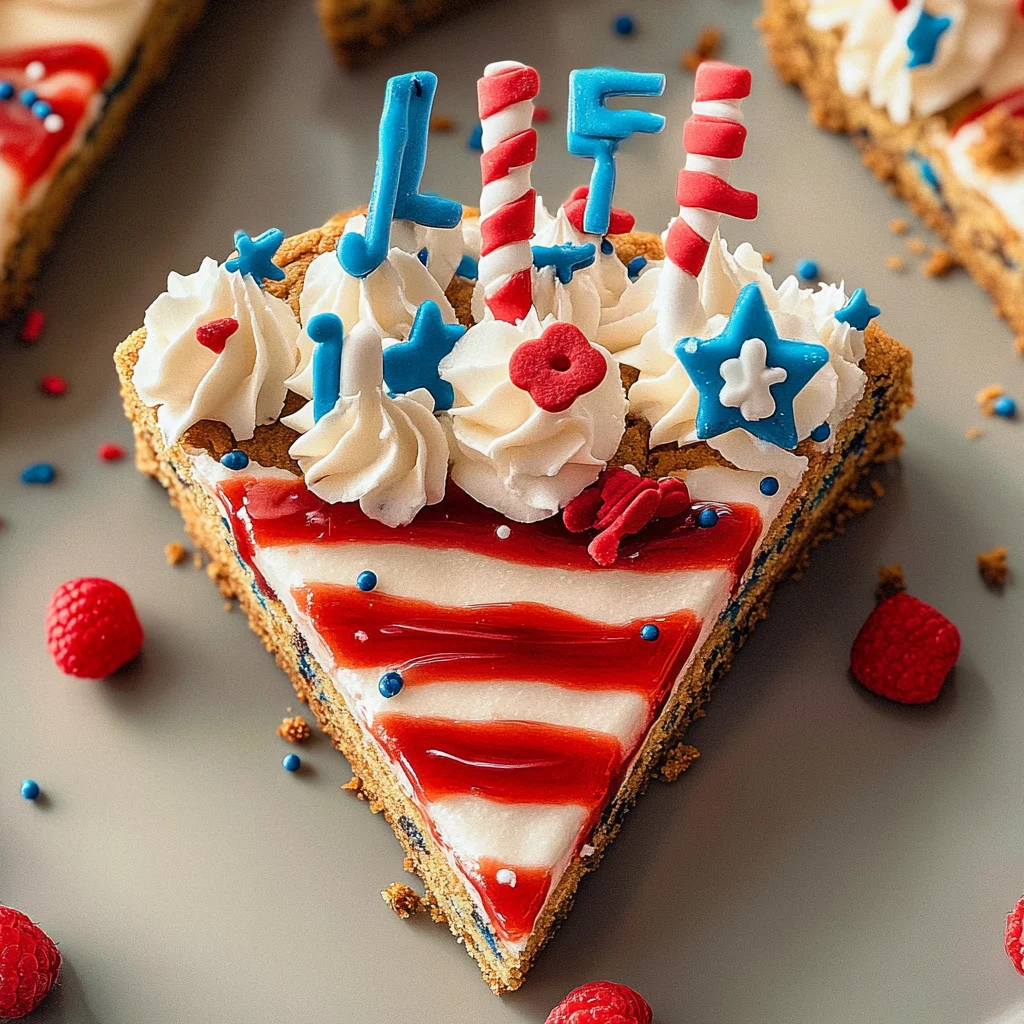
Picture this: a warm, gooey Independence Day Cookie Cake fresh from the oven, its sweet aroma wrapping around you like a cozy blanket on a summer evening. The vibrant red, white, and blue sprinkles dance atop the cake, beckoning you to dive in and savor each mouthful of buttery goodness, where every bite is a celebration of flavor and joy.
As I recall my childhood Independence Day gatherings, nothing could rival the excitement of watching this cake make its grand entrance at the dessert table. It was always the centerpiece that sparked laughter and stories shared with family and friends. Whether it’s for a backyard barbecue or a festive picnic, this delightful treat promises to elevate your celebrations and create memories that will linger long after the last crumb has been devoured.
Why Is Independence Day Cookie Cake So Irresistibly Good?
Indulge in the rich flavors of butter and brown sugar that create a perfectly chewy cookie base. Loaded with gooey chocolate chips, every bite is a delightful treat. Simple preparation means you can whip this up in just 45 minutes, leaving you more time to celebrate! Festive red, white, and blue decorations make it the star of any gathering, while fresh strawberries and blueberries add a burst of flavor and color. This cookie cake is not just a dessert; it’s an unforgettable centerpiece for your Independence Day festivities!
Independence Day Cookie Cake Ingredients
For the Cookie Cake Base
- 1 cup unsalted butter (softened) – Make sure your butter is at room temperature for easy mixing and a creamy texture.
- 1 cup granulated sugar – This adds sweetness and helps to create a light, airy cookie cake.
- 1 cup brown sugar (packed) – The molasses in brown sugar enhances flavor and moisture in your cookie cake.
- 2 large eggs – Eggs bind the ingredients together and add richness to the cake.
- 1 teaspoon vanilla extract – A splash of vanilla elevates the overall flavor profile of your cookie cake.
- 3 cups all-purpose flour – This is the foundation of your cookie cake, providing structure and stability.
- 1 teaspoon baking soda – Acts as a leavening agent, helping the cookie cake rise beautifully.
- 1 teaspoon salt – Balances the sweetness and enhances all the flavors in the cookie cake.
- 2 cups chocolate chips – These melty morsels are essential for that delicious chocolatey goodness in every bite.
For the Frosting and Decoration
- 1 cup unsalted butter (softened) – Use softened butter for a smooth, spreadable frosting that sticks well to your cookie cake.
- 4 cups powdered sugar – This sweetens your frosting while giving it a fluffy texture; sift it first for best results.
- 2 tablespoons heavy cream – Adding cream will make your frosting rich and creamy, perfect for spreading or piping.
- 1 teaspoon vanilla extract – A touch of vanilla enhances the flavor of your frosting, making it irresistible.
- 1 cup red sprinkles – Use these to add a festive touch to your Independence Day Cookie Cake!
- 1 cup blue sprinkles – Blue sprinkles complement the red ones, creating a beautiful patriotic theme.
- 1 cup fresh strawberries (sliced) – Fresh strawberries add a fruity burst of flavor and vibrant color to your decoration.
- 1 cup fresh blueberries – These little gems provide an extra pop of color while being deliciously sweet!
How to Make Independence Day Cookie Cake
1. Preheat the oven to 350°F (175°C) and grease a 9×13 inch baking pan with flour. This will ensure your cookie cake bakes evenly and releases easily once done.
2. Cream together 1 cup of softened unsalted butter, 1 cup of granulated sugar, and 1 cup of packed brown sugar until the mixture is light and fluffy. This step adds a lovely sweetness and texture to your base.
3. Add 2 large eggs one at a time, mixing well after each addition. Then, stir in 1 teaspoon of vanilla extract for that warm, comforting flavor that brings everything together.
4. Whisk together 3 cups of all-purpose flour, 1 teaspoon of baking soda, and 1 teaspoon of salt in another bowl. Gradually incorporate this dry mixture into your wet ingredients until just combined for a soft dough.
5. Fold in 2 cups of chocolate chips gently into the dough, ensuring they are evenly distributed throughout, adding rich pockets of chocolate in every bite.
6. Spread the cookie dough evenly in the prepared baking pan. Use a spatula to smooth out the surface; it should look invitingly thick and ready for baking.
7. Bake for 20-25 minutes or until the edges turn golden brown and a toothpick inserted in the center comes out clean. The aroma will fill your kitchen with delicious anticipation!
8. Allow the cookie cake to cool completely in the pan on a wire rack. This cooling step is crucial for perfect frosting application later on!
For the Frosting:
9. Beat 1 cup of softened unsalted butter until creamy in a mixing bowl. This creates a beautiful base for your frosting that will spread like a dream.
10. Gradually add 4 cups of powdered sugar while mixing until smooth; this will give you that sweet, fluffy texture we all love on our cakes.
11. Add 2 tablespoons of heavy cream and 1 teaspoon of vanilla extract, then beat until fluffy—this adds richness and flavor that perfectly complements your cookie cake.
Decorate the Cookie Cake:
12. Spread the frosting evenly over the top once your cookie cake is completely cool; this layer is where all the magic happens!
13. Decorate with red and blue sprinkles generously, then arrange sliced strawberries and fresh blueberries on top for a festive touch that screams Independence Day!
14. Slice into squares and serve to celebrate Independence Day! Each piece is bursting with flavor and color—perfect for sharing with family and friends.
Optional: Top with extra berries for an even fresher look!
Exact quantities are listed in the recipe card below.
Tips for the Best Independence Day Cookie Cake
- Butter Temperature: Ensure your butter is softened, not melted, for a creamy texture that helps create a light and fluffy cookie cake.
- Egg Addition: Add eggs one at a time, mixing well after each. This ensures even distribution and better incorporation of ingredients for a perfect bake.
- Don’t Overmix: When combining dry and wet ingredients, mix just until combined. Overmixing can lead to a tough cookie cake instead of the soft texture you desire.
- Cooling Time: Allow the cookie cake to cool completely in the pan before frosting. This prevents the frosting from melting and losing its shape on your festive treat.
- Frosting Consistency: If your frosting seems too thick, add an extra splash of heavy cream to achieve a smooth spreadable consistency perfect for decorating your Independence Day Cookie Cake.
- Sprinkle Distribution: For an even look, sprinkle red and blue toppings generously across the entire surface, ensuring every slice is festive and inviting!
How to Store and Freeze Independence Day Cookie Cake
- Room Temperature: Keep your Independence Day Cookie Cake covered in an airtight container for up to 3 days to maintain freshness and flavor.
- Fridge: For longer storage, refrigerate the cookie cake in an airtight container for up to 1 week; this helps preserve the frosting’s texture and taste.
- Freezer: You can freeze the unfrosted cookie cake wrapped tightly in plastic wrap and aluminum foil for up to 3 months. Thaw it in the fridge before frosting.
- Reheating: If you prefer a warm slice, gently reheat individual pieces in the microwave for about 10-15 seconds, ensuring not to overheat and dry them out.
Independence Day Cookie Cake Your Way
Feel free to let your creativity shine as you customize this delightful dessert for your celebrations!
- Gluten-Free: Substitute all-purpose flour with a gluten-free blend to enjoy a deliciously soft cookie cake without the gluten.
This is a great option for those with dietary restrictions. Just ensure your baking soda is also gluten-free!
- Nutty Twist: Add 1 cup of chopped nuts, like walnuts or pecans, for an extra crunch and rich flavor.
The addition of nuts will give your cookie cake a delightful texture and depth. It pairs wonderfully with the sweetness of the chocolate chips.
- Minty Fresh: Incorporate 1 teaspoon of peppermint extract instead of vanilla for a cool, refreshing twist.
This variation creates a festive vibe that’s perfect for summer gatherings. The mint complements the chocolate beautifully!
- Double Chocolate: Use 1 cup of dark chocolate chips instead of semi-sweet for a richer taste.
The deeper chocolate flavor will satisfy even the most devoted chocolate lovers. It’s perfect for those who crave an indulgent treat!
- Fruity Swirl: Fold in 1 cup of dried cranberries or cherries into the batter for added tartness.
This fruity addition not only enhances flavor but also adds beautiful pops of color throughout the cake. It’s a wonderful surprise in every bite!
- Vegan-Friendly: Replace butter with coconut oil and eggs with flaxseed meal mixed with water (2 tablespoons flaxseed + 6 tablespoons water).
You’ll still enjoy a rich, moist cookie cake while keeping it plant-based. The coconut oil adds a subtle tropical flavor that’s simply delightful!
- Spicy Kick: Mix in 1 teaspoon of cinnamon or chili powder for a warm, spicy note that contrasts beautifully with sweetness.
This unexpected twist can awaken your taste buds and add an exciting layer to your dessert. Perfect for those who love a little heat!
Make Ahead Options
Preparing this festive Independence Day Cookie Cake in advance is a fantastic way to streamline your holiday celebrations. You can make the cookie cake base up to 24 hours ahead of time. Simply follow the steps to prepare the cookie dough, bake it, and let it cool completely before storing it in an airtight container at room temperature. The frosting can also be made 1-2 days in advance; just keep it covered in the fridge and give it a quick stir before spreading. For a fresh touch, slice the strawberries and blueberries no more than a few hours before serving to maintain their vibrant color and texture. This way, when it’s time to celebrate, all you need to do is frost the cake and decorate it with sprinkles for that patriotic flair! Enjoy hassle-free holiday fun with your beautifully prepared Independence Day Cookie Cake!
Independence Day Cookie Cake Recipe FAQs
What type of butter should I use for the cookie cake?
Using unsalted butter is best for this Independence Day Cookie Cake, as it allows you to control the salt levels in your recipe. Ensure the butter is softened to room temperature for easy creaming with the sugars, which helps create a light and fluffy texture.
Can I substitute any ingredients if I’m out of something?
Absolutely! If you’re short on brown sugar, you can replace it with an equal amount of granulated sugar, though it will slightly change the flavor. For chocolate chips, feel free to mix in nuts or dried fruit like cranberries for a festive twist. And if you need a dairy-free option, try using a plant-based butter substitute in both the cookie and frosting.
How should I store leftover cookie cake?
To keep your cookie cake fresh, store it in an airtight container at room temperature for up to 3 days. If you prefer, you can refrigerate it for a longer shelf life, about 5–7 days. Just be sure to let it come back to room temperature before serving for optimal taste and texture!
Can I freeze my Independence Day Cookie Cake?
Yes! You can freeze this cookie cake by wrapping it tightly in plastic wrap and then placing it in an airtight container or freezer bag. It will stay good for up to 2 months. When ready to enjoy, just thaw it in the refrigerator overnight and frost it before serving.
What size servings does this recipe yield?
This delightful cookie cake serves approximately 8 people, providing generous slices perfect for sharing during your Independence Day celebrations. Feel free to adjust the serving sizes based on your gathering; just remember that it’s hard to resist seconds!
What are some tips for decorating my cookie cake?
For a beautiful presentation, wait until your cookie cake has completely cooled before spreading the frosting. Use an offset spatula for smooth application. When decorating with sprinkles and fresh fruits like strawberries and blueberries, arrange them in a way that highlights the red, white, and blue theme—this will make your dessert not only delicious but also a stunning centerpiece at your celebration!