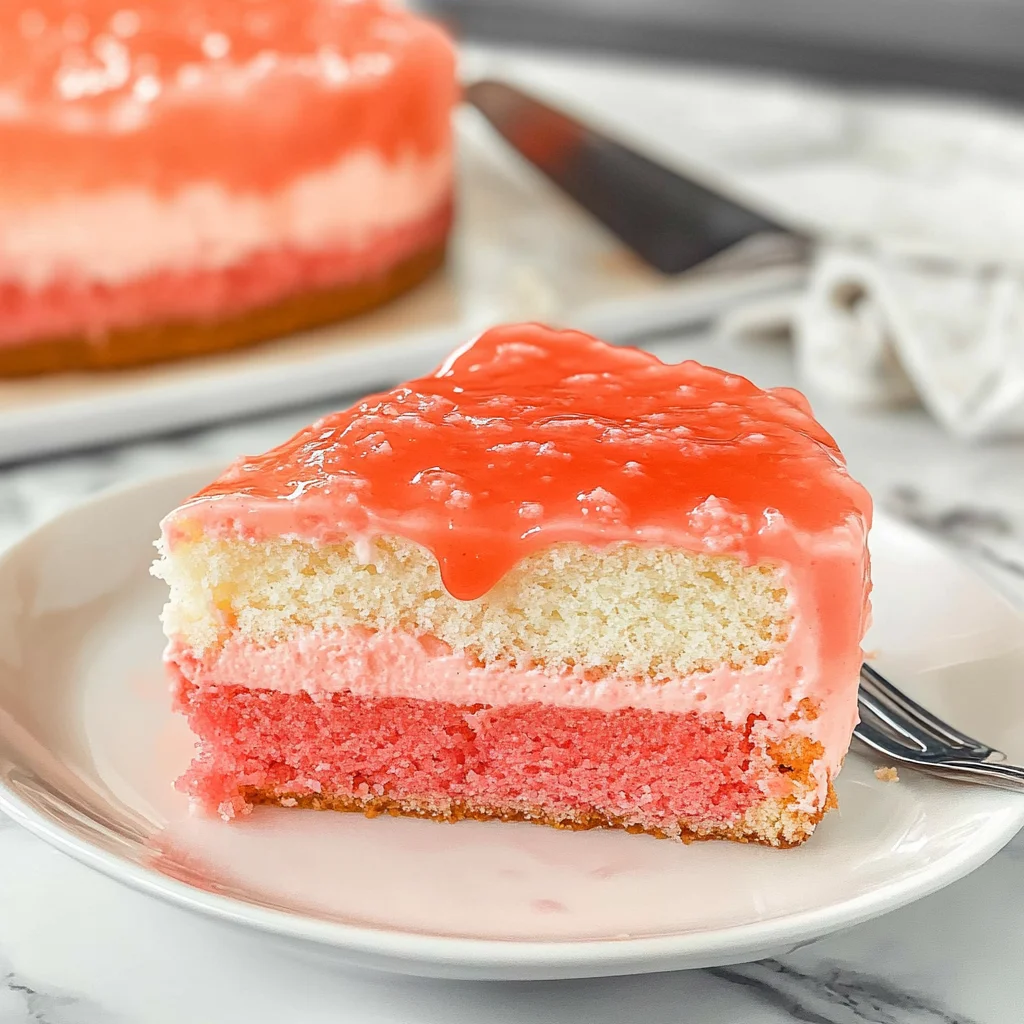
Imagine slicing into a Hawaiian Guava Cake, where the sweet scent of ripe guavas dances through the air, mingling with a hint of vanilla and coconut. Each bite reveals a moist, tender crumb that melts in your mouth, bursting with tropical flavors that whisk you away to sun-soaked beaches and swaying palm trees.
This cake isn’t just a dessert; it’s a slice of paradise that brings back memories of summer gatherings and laughter shared with friends and family. Whether served at a luau or as a delightful treat after dinner, the Hawaiian Guava Cake promises an unforgettable flavor experience that will leave everyone reaching for just one more slice.
Why Is Hawaiian Guava Cake So Irresistibly Good?
Fresh guava gives this cake a unique tropical flavor that transports you straight to paradise. Moist and tender, the cake melts in your mouth, making it an instant crowd-pleaser. Easy to whip up in just 20 minutes of prep, it’s perfect for last-minute gatherings. Creamy frosting with a hint of lime elevates each bite, ensuring every slice is unforgettable. Whether you’re celebrating or just indulging, this cake is sure to become a beloved favorite!
Hawaiian Guava Cake Ingredients
For the Batter
- 1 cup all-purpose flour – This forms the base of your cake, providing structure and texture.
- 1 cup mashed ripe guava (fresh or canned) – Fresh guava adds a tropical flavor that makes this Hawaiian Guava Cake truly special.
- 1/2 cup granulated sugar – Sweetens the cake while helping to create a moist crumb.
- 1/2 cup unsalted butter (softened) – Ensures a rich, buttery flavor and tender texture in your cake.
- 2 large eggs – Acts as a binding agent, adding moisture and richness to the batter.
- 1 teaspoon baking powder – This leavening agent helps the cake rise for a light and fluffy result.
- 1/2 teaspoon vanilla extract – Enhances the overall flavor profile with a warm, sweet note.
- 1/4 teaspoon salt – Balances the sweetness and enhances all the flavors in the cake.
For the Frosting
- 1 cup cream cheese (softened) – Creates a creamy base for your frosting with a tangy flavor that complements the guava.
- 1/2 cup powdered sugar – Sweetens the frosting while keeping it smooth and silky in texture.
- 1/4 cup heavy cream – Adds richness and helps achieve a luscious consistency for spreading.
- 1 teaspoon lime juice – Brightens up the frosting with a zesty kick that pairs beautifully with guava.
How to Make Hawaiian Guava Cake
1. Preheat the oven to 350°F (175°C). Grease and flour a cake pan, ensuring it’s well-prepared for your delightful guava cake to pop out effortlessly once baked.
2. Cream together the softened butter and granulated sugar in a mixing bowl until light and fluffy. This step is crucial for creating that airy texture we all love in a moist cake.
3. Add the eggs one at a time, beating well after each addition. Stir in the vanilla extract for an extra layer of warmth and flavor that complements the guava beautifully.
4. Whisk together the flour, baking powder, and salt in another bowl. This will help evenly distribute the leavening agent and ensure your Hawaiian Guava Cake rises perfectly.
5. Gradually combine the dry ingredients with the wet mixture, alternating with the mashed ripe guava until just combined. Your batter should be thick and fragrant, filled with tropical goodness.
6. Pour the batter into the prepared cake pan and smooth the top with a spatula. This will create an even surface, ensuring your cake bakes uniformly.
7. Bake for 25-30 minutes or until a toothpick inserted in the center comes out clean. Keep an eye on it; you want a golden-brown top that signals deliciousness!
8. Cool the cake in the pan for 10 minutes before transferring it to a wire rack to cool completely. This helps set the structure without losing its moisture.
For the Frosting:
9. Beat the softened cream cheese in a mixing bowl until smooth, creating a creamy base for your frosting that will complement the cake’s flavors perfectly.
10. Add powdered sugar and heavy cream gradually, mixing until well combined. The frosting should be luscious and creamy—perfect for spreading on your cooled cake!
11. Stir in lime juice until your frosting is smooth and creamy, adding a zesty kick that balances out the sweetness of both the cake and frosting beautifully.
Assemble:
12. Spread the cream cheese frosting evenly over the top of your completely cooled Hawaiian Guava Cake, allowing it to shine with its tropical flair.
13. Slice and serve your delightful creation, garnished with additional guava slices if desired—a lovely touch that adds color and freshness!
Optional: Garnish with toasted coconut flakes for added texture and flavor!
Exact quantities are listed in the recipe card below.
Tips for the Best Hawaiian Guava Cake
- Use Ripe Guava: Choose fully ripe guavas for the best flavor and moisture. Avoid underripe fruit, which can be too tart.
- Cream Butter Properly: Beat the butter and sugar until light and fluffy. This step is crucial for achieving a tender texture in your Hawaiian Guava Cake.
- Don’t Overmix: When combining wet and dry ingredients, mix until just combined to keep the cake light and airy. Overmixing can lead to a dense cake.
- Check Oven Temperature: Ensure your oven is properly calibrated. An incorrect temperature can cause uneven baking or a dry cake.
- Cool Completely: Let the cake cool thoroughly before frosting. A warm cake can cause the cream cheese frosting to melt and slide off.
- Garnish Wisely: For an appealing presentation, top with fresh guava slices or lime zest to enhance the tropical feel of your Hawaiian Guava Cake.
How to Store Hawaiian Guava Cake

- Room Temperature: Enjoy your Hawaiian Guava Cake fresh for up to 2 days. Keep it covered with a cake dome or in an airtight container to maintain moisture.
- Fridge: If you’re planning to savor it longer, store the cake in the fridge for up to 5 days. Make sure to wrap it tightly to prevent drying out and absorb unwanted odors.
- Freezer: For extended storage, freeze slices of Hawaiian Guava Cake in an airtight container or freezer bag for up to 3 months. Thaw in the fridge overnight before enjoying.
- Reheating: If you prefer your cake warm, reheat individual slices in the microwave for about 15-20 seconds. This will bring back its delightful moistness and flavor!
Hawaiian Guava Cake Your Way
Feel free to let your creativity shine by customizing this delightful dessert to suit your tastes!
- Gluten-Free: Use a 1:1 gluten-free baking flour in place of all-purpose flour for a deliciously moist result. This swap allows those with gluten sensitivities to indulge without sacrificing flavor or texture.
- Coconut Twist: Replace half the butter with coconut oil for a tropical flair that enhances the cake’s flavor. The subtle coconut essence will transport your taste buds straight to a Hawaiian paradise.
- Zesty Lime: Add the zest of one lime to the batter for an extra citrus kick that complements the guava beautifully. This brightens the flavor and adds a refreshing twist to each bite.
- Nutty Crunch: Stir in 1/2 cup of chopped macadamia nuts or walnuts for added texture and nuttiness. The crunch pairs perfectly with the soft, moist cake, creating a delightful contrast.
- Spicy Kick: Incorporate 1/2 teaspoon of ground cinnamon or nutmeg into the batter for warm, cozy undertones. These spices will elevate the cake’s complexity and make it even more comforting.
- Creamy Variation: Swap cream cheese frosting for whipped coconut cream for a lighter, dairy-free option. The airy texture will provide a lovely contrast to the dense cake while keeping it decadent.
- Fruity Surprise: Fold in 1/2 cup of diced fresh pineapple or mango into the batter for an additional layer of tropical goodness. This fruity addition not only enhances flavor but also adds bursts of juiciness throughout!
Make Ahead Options
If you’re planning a tropical gathering or simply want a slice of paradise at home, this Hawaiian Guava Cake is perfect for meal prep. You can prepare the cake batter ahead of time by combining 1 cup of all-purpose flour, 1 teaspoon of baking powder, and 1/4 teaspoon of salt in one bowl, while creaming together 1/2 cup of softened unsalted butter and 1/2 cup of granulated sugar in another. The mashed ripe guava—whether fresh or canned—can also be ready to mix in when you’re set to bake. For the frosting, beat together 1 cup of softened cream cheese, 1/2 cup of powdered sugar, and 1/4 cup of heavy cream ahead (up to 3 days in advance) and refrigerate it until you’re ready to assemble. Just remember to bake the cake within 24 hours for the best texture, allowing it to cool completely before frosting. When it’s time to serve your delightful Hawaiian Guava Cake, spread that creamy frosting on top and garnish with fresh guava slices for a stunning finish!
Hawaiian Guava Cake Recipe FAQs
Can I use a different type of flour instead of all-purpose flour?
Absolutely! You can substitute all-purpose flour with cake flour for a lighter texture, or even almond flour if you’re looking for a gluten-free option. Just note that the texture may vary slightly, so keep an eye on the baking time.
What’s the best way to store leftover Hawaiian Guava Cake?
To keep your cake moist and delicious, store it in an airtight container at room temperature for up to 2 days. If you need to store it longer, refrigerate it for up to a week. Just be sure to let it come to room temperature before serving for the best flavor!
Can I freeze Hawaiian Guava Cake?
Yes! You can freeze this delightful cake for up to 3 months. To do so, wrap individual slices or the whole cake tightly in plastic wrap and then aluminum foil. When you’re ready to enjoy it again, simply thaw in the refrigerator overnight and let it come to room temperature before serving.
What are some substitutions for the cream cheese frosting?
If cream cheese isn’t your thing, you can make a simple whipped cream frosting by whipping heavy cream with powdered sugar until soft peaks form. For a dairy-free option, try coconut cream mixed with powdered sugar and a hint of vanilla extract for a tropical twist!
How many servings does this recipe yield?
This Hawaiian Guava Cake recipe serves about 4 people, making it perfect for an intimate gathering or as a treat after dinner. If you’re expecting more guests, consider doubling the recipe and baking in two pans for more generous slices!
What should I do if my cake isn’t rising properly?
If your cake doesn’t rise as expected, check that your baking powder is fresh—it should bubble when mixed with liquid. Also, ensure you’re not overmixing the batter once you add the dry ingredients; mixing just until combined helps keep your cake light and fluffy!