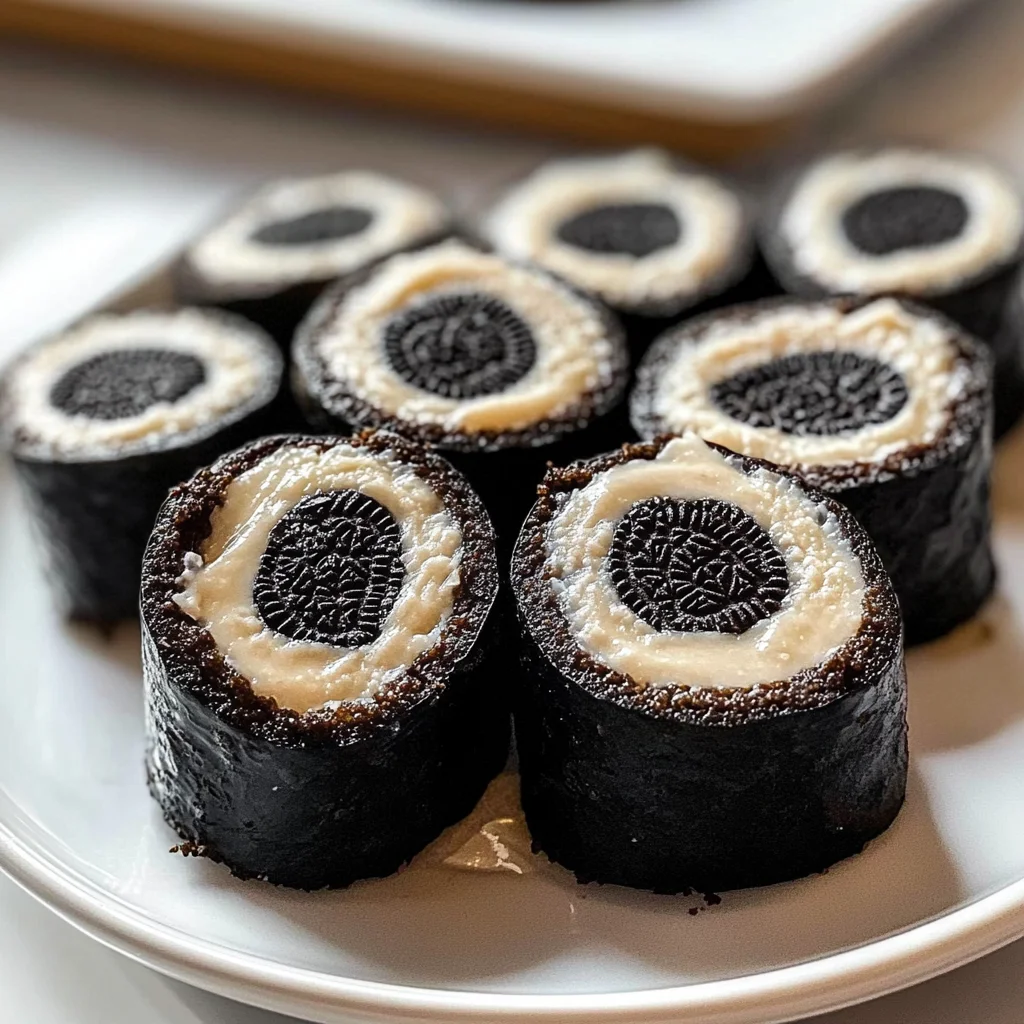
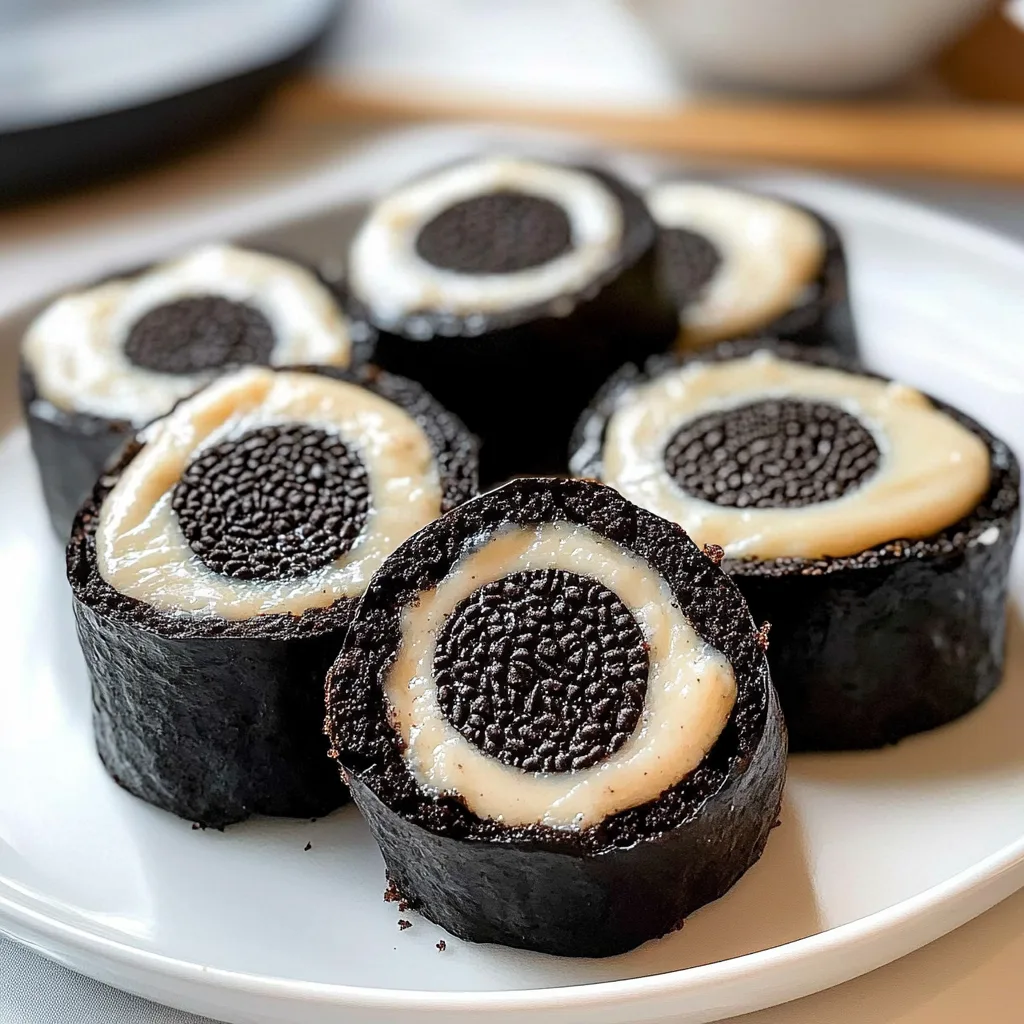
Imagine sinking your teeth into a sweet, crunchy delight where the classic flavors of Oreos meet the gooey goodness of rice crispy treats. These Oreo sushi rolled treats are not just a dessert; they’re an experience that brings joy to any gathering, from birthday parties to cozy movie nights.
I still remember the first time I made these whimsical treats for a family get-together, and the laughter that ensued as everyone tried to figure out how to slice them without making a mess. With each bite, the creamy filling and crispy textures danced together, creating a flavor explosion that left everyone craving more. Get ready for a fun and delicious adventure that will have your taste buds doing the happy dance!
Why Will You Keep Making Oreo sushi rolled treats?
Deliciously unique: These fun treats combine the beloved flavors of Oreos and rice crispy goodness in a playful sushi roll format.
Quick prep time: Ready in just 15 minutes, they’re perfect for last-minute gatherings or sweet cravings.
Crowd-pleaser: With chocolate, sprinkles, and creamy filling, everyone will love these delightful bites!
Versatile options: Feel free to customize fillings or toppings for endless variations—perfect for any occasion.
Easy to make: No baking required! Just mix, roll, and enjoy your delicious creations with family and friends.
Oreo sushi rolled treats Ingredients
- For the Base
- 4 cups Rice cereal – This crispy base gives a delightful crunch to your treats.
- 1 cup Mini marshmallows – These melt into gooey sweetness, binding the ingredients together.
- 3 tablespoons Butter (Melted) – Adds richness and helps everything stick nicely.
- For the Filling
- 10 pieces Oreo cookies (Crushed) – These provide a chocolaty flavor that pairs perfectly with the cream cheese.
- 1 cup Cream cheese (Softened) – This creamy element balances the sweetness and creates a luscious filling.
- For the Topping
- 1 cup Chocolate chips (Melted) – Drizzling melted chocolate adds an irresistible finish to your Oreo sushi rolled treats.
- 1 cup Sprinkles – A colorful touch that makes these treats even more fun and festive!
How to Make Oreo sushi rolled treats
1. Combine Ingredients: In a large mixing bowl, combine 3 tablespoons of melted butter and 1 cup of mini marshmallows. Microwave in 30-second intervals until melted and smooth, about 1-2 minutes total.
2. Mix Rice Cereal: Stir in 4 cups of rice cereal until fully coated with the marshmallow mixture. Allow this delightful mix to cool slightly, making it easier to handle.
Assemble the Sushi:
3. Prepare the Base: Lay a sheet of parchment paper on a rolling mat. Spread the rice cereal mixture evenly over the parchment, pressing down firmly to form a rectangle about ½ inch thick.
4. Blend Filling: In a separate bowl, mix 10 crushed Oreo cookies with 1 cup of softened cream cheese until well combined. This creamy filling will add a rich flavor to your treats.
5. Roll It Up: Using the rolling mat, carefully roll the mixture tightly into a log shape. Take your time to ensure it’s compact and holds together beautifully.
Finish and Serve:
6. Slice Treats: Slice the rolled treat into sushi-sized pieces, revealing the delicious layers inside. Dip each piece in melted chocolate and sprinkle with additional sprinkles for that festive touch.
7. Serve or Chill: Serve immediately or refrigerate until ready to serve, allowing those flavors to meld beautifully!
Optional: Drizzle extra melted chocolate on top for an indulgent finish!
Exact quantities are listed in the recipe card below.
Expert Tips
- Perfectly Melted Marshmallows: Ensure the butter and mini marshmallows are fully melted and smooth before adding the rice cereal for a cohesive mixture.
- Cool Before Spreading: Allow the rice cereal base to cool slightly; spreading it too warm can lead to a sticky mess when rolling up your Oreo sushi rolled treats.
- Even Oreo Layer: When mixing crushed Oreos with cream cheese, aim for an even spread over the rice layer to ensure every bite is deliciously balanced.
- Tight Rolling: Use the rolling mat to tightly roll the mixture into a log shape. A loose roll may cause it to fall apart when sliced.
- Chill for Firmness: If you find the roll too soft, refrigerate it for about 30 minutes before slicing. This helps maintain shape and enhances flavor.
- Decorative Sprinkles: Don’t skip on the sprinkles! They add a fun visual appeal and extra crunch, making your Oreo sushi rolled treats irresistible.
How to Store and Freeze Oreo sushi rolled treats
- Room Temperature: Keep the Oreo sushi rolled treats in an airtight container for up to 2 days. Enjoy them fresh for the best texture and flavor!
- Fridge: Store in the refrigerator for up to 5 days. Place in a tightly sealed container to maintain freshness and prevent absorption of other odors.
- Freezer: If you want to enjoy them later, freeze the treats wrapped individually in plastic wrap and then place them in a freezer-safe bag for up to 1 month.
- Thawing: To enjoy frozen Oreo sushi rolled treats, thaw them in the refrigerator overnight before serving.
Oreo sushi rolled treats Your Way
Get ready to unleash your creativity with these delightful desserts by personalizing them to suit your taste!
- Nutty Crunch: Swap in 1 cup of chopped nuts for added texture and flavor. Pecans or almonds can bring a lovely crunch that complements the creamy filling beautifully. The combination of nutty richness with the sweetness of the marshmallows is simply irresistible.
- Peanut Butter Bliss: Mix 1/2 cup of creamy peanut butter into the cream cheese filling. This adds a deliciously nutty twist that pairs perfectly with Oreos. Imagine each bite delivering a delightful balance of flavors, making it a hit for peanut butter lovers.
- Chocolate Lovers: Use double-stuffed Oreos instead of regular ones for an extra chocolatey experience. This variation doubles down on the cocoa flavor, taking your treats to a whole new level. Each roll will be rich and decadent, satisfying any chocolate craving.
- Fruity Delight: Incorporate 1/2 cup of finely chopped strawberries or bananas into the filling for a fruity burst. The freshness of fruit balances the sweetness, adding an exciting new layer to every bite. It’s like a little surprise hidden within the deliciousness!
- Coconut Twist: Substitute some rice cereal with 1 cup of shredded coconut for a tropical flair. Toasted coconut adds a wonderful chewiness and richness that enhances the overall flavor profile. Each bite transports you to a sunny beach getaway!
- Spicy Surprise: Add a pinch of cayenne pepper to the melted chocolate topping for a surprising kick. This unexpected heat contrasts beautifully with the sweet treats, creating an intriguing flavor profile that keeps everyone guessing.
- Colorful Fun: Instead of traditional sprinkles, use themed sprinkles to match your celebration or mood! From holiday shapes to vibrant colors, these fun additions make your dessert visually appealing and festive, perfect for any occasion!
Make Ahead Options
If you’re looking to save time and stress, these Oreo sushi rolled treats are perfect for meal prep! You can prepare the base by combining melted butter and mini marshmallows, then mixing in the rice cereal. This part can be done up to 24 hours in advance; just ensure it cools slightly before assembling. The filling of crushed Oreos and softened cream cheese can also be prepped ahead, lasting in the fridge for up to 3 days. When you’re ready to serve, simply roll everything up, slice it into sushi-sized pieces, dip them in melted chocolate, and sprinkle with vibrant sprinkles. This way, you’ll have a delightful treat that’s ready to impress without the last-minute rush!
Oreo sushi rolled treats Recipe FAQs
What type of rice cereal is best for this recipe?
Any brand of crisped rice cereal will work wonderfully! Look for a classic option that stays crunchy, as it will provide the right texture for your Oreo sushi rolled treats. Avoid flavored varieties to keep the focus on the delicious Oreo and cream cheese filling.
Can I use regular marshmallows instead of mini marshmallows?
Absolutely! If you only have regular marshmallows on hand, just cut them into smaller pieces to help them melt more easily. Keep in mind that you might need slightly more than 1 cup to achieve the same gooey texture since they can be a bit denser.
How should I store leftover Oreo sushi rolled treats?
Store any leftovers in an airtight container at room temperature for up to 3 days. If you’d like them to last longer, refrigerate them for up to a week. Just remember, they are best enjoyed fresh!
Can I freeze these treats for later enjoyment?
Yes, you can freeze your Oreo sushi rolled treats! Wrap each piece tightly in plastic wrap and place them in a freezer bag. They’ll stay good for about 2 months. To enjoy, simply thaw them in the fridge overnight or at room temperature for a few hours before serving.
What if my rice cereal mixture is too sticky to roll?
If you find that your mixture is too sticky, allow it to cool a bit longer before trying to roll it. You can also lightly grease your hands or use a small amount of cooking spray on your rolling mat to make handling easier and prevent sticking.
How many servings does this recipe yield?
This recipe makes about 4 servings, with each delightful slice containing around 250 calories. Perfect for sharing with family or enjoying by yourself as a sweet treat!
Oreo Sushi Rolled Treats
Ingredients
Method
- In a large mixing bowl, combine melted butter and mini marshmallows. Microwave in 30-second intervals until melted and smooth.
- Stir in the rice cereal until fully coated. Allow to cool slightly.
- Lay a sheet of parchment paper on a rolling mat. Spread the rice cereal mixture evenly over the parchment, pressing down to form a rectangle.
- In a separate bowl, mix crushed Oreos with softened cream cheese. Spread this mixture over the rice cereal layer.
- Using the rolling mat, carefully roll the mixture tightly into a log shape.
- Slice the rolled treat into sushi-sized pieces. Dip each piece in melted chocolate and sprinkle with additional sprinkles if desired.
- Serve immediately or refrigerate until ready to serve.